先日公開され、早速インストールしてみた Windows 10 Technical Preview ですが、
あれこれと試してみた後で手軽に元に戻したいです。
もちろん、仮想化環境で作業を行っているので、そんな時はスナップショットをとればいいのですが、
それでは少し面白みに欠けるので、Vagrant で立ち上げられるような状態にしてみたいと考えて試みました。
というか、それが目的で Virtual Box を利用しました。
1.事前準備
- Virual Box のインストール
- Vagrant のインストール(1.6系)
当初、私のPCにインストールされていた Vagrant は 1.5.4 でした。
1.5系までは Vagrant そのままでは Windows をゲストとして扱うことは出来ず、Vagrant-windows というPluginを使う必要があります。
ただ、何度かやってみたのですがうまくこれがインストールできませんでした。
Vagrant としては、1.6系になって Windows を正式に対応しているので、今回はこれを用いることにしました。
Windows Guests – Windows is now a first-class officially supported guest OS for Vagrant, meaning you can now
vagrant updevelopment environments running on Windows.
https://www.vagrantup.com/blog/vagrant-1-6.html#features
2.Windows10 Technical Preview インストール
基本的なインストール方法は前回のエントリーを参照。
2.1 vagrant が操作可能なように、”vagrant”ユーザーを作成する。
パスワードも”vagrant”。
OSインストール時のユーザーをそうしてしまってもいいし、後から追加してもいい。
後から追加した場合は、Administrators グループへ追加する
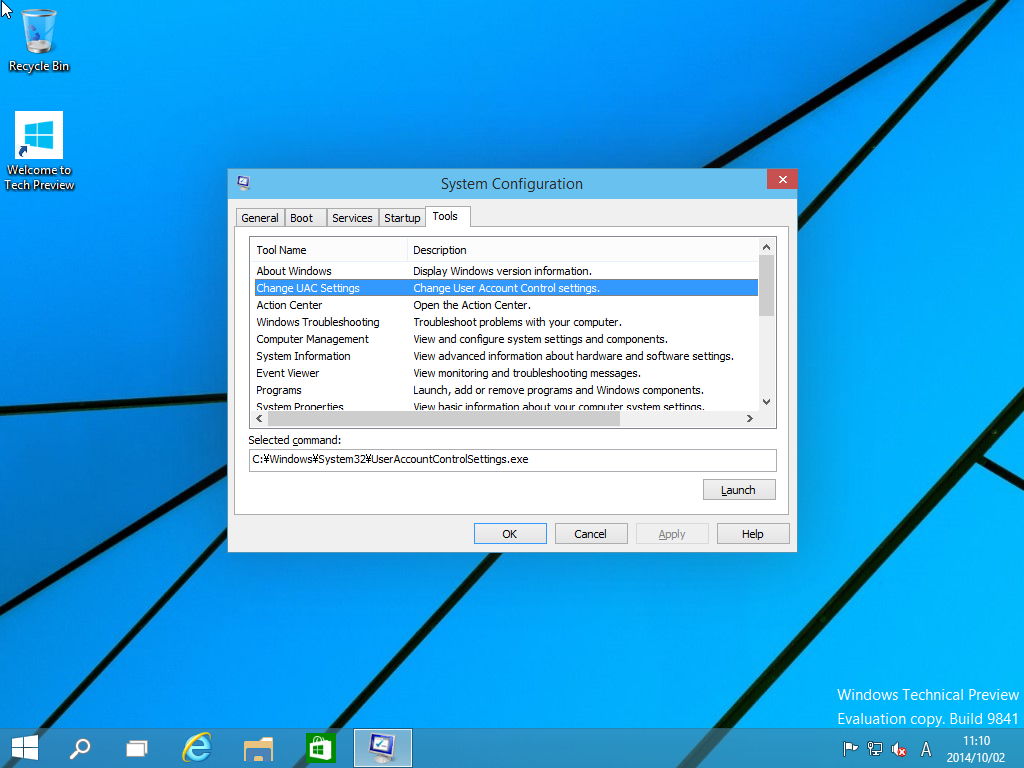
2.2 UACをOFFにする。
msconfig を起動し、 “tools” から “Change UAC settings”を選んで Launch するとOn/Offまでの時間を少し楽できる
2.3 WinRM に関する設定を行う
コマンドプロンプトで以下のコマンドを実行する
winrm quickconfig -q
winrm set winrm/config/winrs @{MaxMemoryPerShellMB="512"}
winrm set winrm/config @{MaxTimeoutms="1800000"}
winrm set winrm/config/service @{AllowUnencrypted="true"}
winrm set winrm/config/service/auth @{Basic="true"}
sc config WinRM start= auto
2.4 Virtual Box Guest Additions のインストール
Virtual BoxのゲストOSウィンドウから 「デバイス」→「Guest Additions のCDイメージを挿入」を選び、
ゲストOS側でインストーラーを起動する。
ただ、Guest Additions のインストールは Windows 10 Technical Preview ではうまくいかなかった。
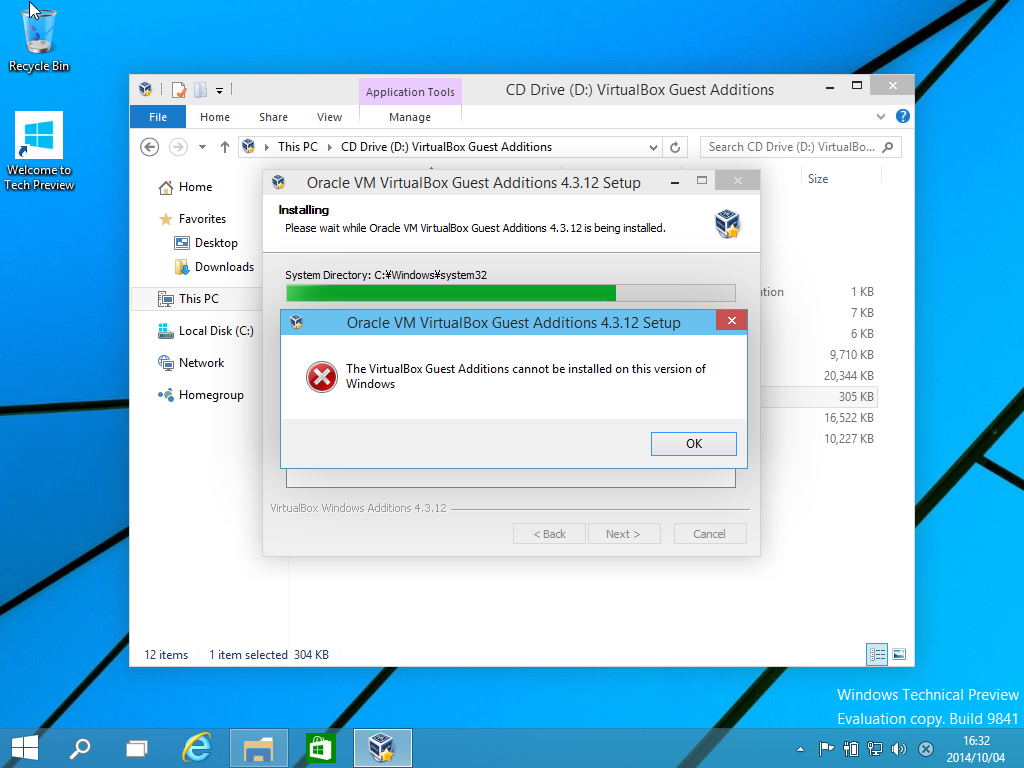
単純にインストーラーを実行すると上記のようにエラーが発生してしまい、そもそもインストーラーがまともに動かない。
こちらへの対策は互換性設定を行うことになる
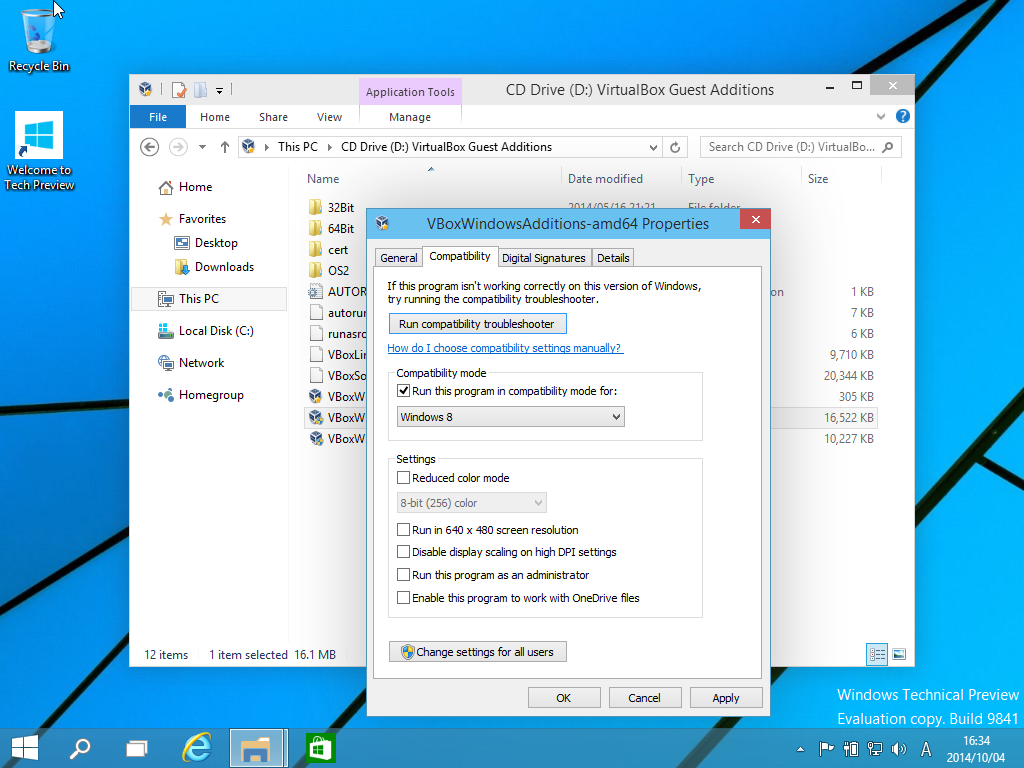
一応、上記のように Windows8 互換で動作するようにしておけばインストーラーは動くには動いた。
ただ、最後の最後までは正しくセットアップされてないように感じる。
この理由は後述。
とりあえず、ゲストOS側の設定は以上となるので、Windows10 をシャットダウンします。
お好みでリモートデスクトップ設定をしておいてもいい。
3. Box の作成と追加
早速作った仮想環境を、Vagrant で扱えるようにパッケージングします
>vagrant package --base "Win10x64" --vagrantfile Vagrantfile.txt
==> Win10x64: Exporting VM...
==> Win10x64: Compressing package to: C:/VM/Win10/package.box
==> Win10x64: Packaging additional file: Vagrantfile.txt
The executable 'bsdtar' Vagrant is trying to run was not
found in the %PATH% variable. This is an error. Please verify
this software is installed and on the path.
vagrant package で、 base として指定している”Win10x64″は仮想環境の名前になりますが、エラーが発生しました。
このエラーが発生する場合、Vagrant へのパス設定がうまくいっていないので”Vagrant\embedded\mingw\bin”をPATH環境変数に追加します
>vagrant package --base "Win10x64" --vagrantfile Vagrantfile.txt
==> Win10x64: Exporting VM...
==> Win10x64: Compressing package to: C:/VM/Win10/package.box
==> Win10x64: Packaging additional file: Vagrantfile.txt
今度はうまくいったようです。
ちなみに、Package する際に Vagrantfile.txt を指定していますが、これは必ずしも必要ではないと思います。
続いて、作成した”package.box”を Vagrant へ追加するため、 Vagrant box add を実行します
>vagrant box add Win10x64TP package.box
==> box: Adding box 'Win10x64TP' (v0) for provider:
    box: Downloading: file://C:/VM/Win10/package.box
    box: Progress: 100% (Rate: 752M/s, Estimated time remaining: --:--:--)
==> box: Successfully added box 'Win10x64TP' (v0) for 'virtualbox'!
同じ名前でも構わないのですが、なんとなく Box の名前は Win10x64TP としてみました。特に深い意味はありません。
これで一通りの準備が整いました。
4. Vagrant UP へ
適当なフォルダを作って、起動のための下準備を行います。
>vagrant init
A `Vagrantfile` has been placed in this directory. You are now
ready to `vagrant up` your first virtual environment! Please read
the comments in the Vagrantfile as well as documentation on
`vagrantup.com` for more information on using Vagrant.
いつも通り init して、出来上がった Vagrantfile を編集します。
Vagrant.configure(VAGRANTFILE_API_VERSION) do |config|
  config.vm.guest = :windows
  config.vm.box = "Win10x64TP"
  config.vm.communicator = "winrm"
  config.vm.network :forwarded_port, guest: 3389, host: 13389
  config.vm.network :forwarded_port, guest: 5985, host: 15985, id: "winrm", auto_correct: true

 <中略>

 config.vm.provider "virtualbox" do |vb|
 # # Don't boot with headless mode
 vb.gui = true
 #
 # # Use VBoxManage to customize the VM. For example to change memory:
 # vb.customize ["modifyvm", :id, "--memory", "1024"]
 end

 <略>
最初の場所で、OS周辺の指定を行います。
また、通常は SSH でやり取りしますが、Windows の場合は WinRM を利用するのでこちらも記述します。
現状ではポート周りの設定もついでに書いておきます。
ちなみに、このvm.communicator の指定を winrm としなかった場合、立ち上がるには立ち上がりますが、応答がないために延々とリトライしてしまいます。
また、通常 Vagrant の場合は SSH で操作を行うために GUI は切られていますが、ここでは Vagrant up した際に Virtual Box の画面を出すようにしてあります。
これは、基本的に最初に作られた Vagrantfile でコメントされているところを戻しただけです。
ようやく準備が出来たので Vagrant up である
>vagrant up
Bringing machine 'default' up with 'virtualbox' provider...
==> default: Importing base box 'Win10x64TP'...
==> default: Matching MAC address for NAT networking...
==> default: Setting the name of the VM: win10tp_default_1412433990299_77042
==> default: Clearing any previously set network interfaces...
==> default: Preparing network interfaces based on configuration...
    default: Adapter 1: nat
==> default: Forwarding ports...
    default: 3389 => 13389 (adapter 1)
    default: 5985 => 15985 (adapter 1)
==> default: Booting VM...
==> default: Waiting for machine to boot. This may take a few minutes...
==> default: Machine booted and ready!
==> default: Checking for guest additions in VM...
    default: No guest additions were detected on the base box for this VM! Guest
    default: additions are required for forwarded ports, shared folders, host only
    default: networking, and more. If SSH fails on this machine, please install
    default: the guest additions and repackage the box to continue.
    default:
    default: This is not an error message; everything may continue to work properly,
    default: in which case you may ignore this message.
==> default: Mounting shared folders...
    default: /vagrant => C:/Dev/vbox/win10tp
見て分かる通り、 Guest Additions 関係のエラーが出ていて、うまく認識できていないことがうかがえる。
ちなみに、当然かもしれないがリモートデスクトップではうまく接続できなかった。
とはいえ、 GUI をONにすればリモートデスクトップはそれほど必要がないのであまり気にしないでいいだろう。
簡単ではあるけれど、 vagrant halt しての停止。 vagrant destroy。そして vagrant up と一通り動いているように見える。
5. 失敗例
実は、Guest Additions を互換性設定せずにインストール。つまり、インストールに失敗したままで進めた場合に、Box のパッケージングや Add までは成功するが、いざ Vagrant up するとエラーになった。
>vagrant up
Bringing machine 'default' up with 'virtualbox' provider...
==> default: Importing base box 'Win10x64TP'...
There was an error while executing `VBoxManage`, a CLI used by Vagrant
for controlling VirtualBox. The command and stderr is shown below.

Command: ["import", "C:/Users/username/.vagrant.d/boxes/Win10x64TP/0/virtualbox/box.ovf", "--vsys", "0", "--vmname", "Win10x64TP_1_1412225893803_7237", "--vsys", "0", "--unit", "10", "--disk", "c:\\Users\\username\\VirtualBox VMs\\Win10x64TP_1_1412225893803_7237\\box-disk1.vmdk"]

Stderr: 0%...10%...20%...30%...40%...50%...60%...70%...80%...90%...100%
Interpreting C:\Users\username\.vagrant.d\boxes\Win10x64TP\0\virtualbox\box.ovf...
OK.
0%...
Progress state: VBOX_E_FILE_ERROR
VBoxManage.exe: error: Appliance import failed
VBoxManage.exe: error: Could not create the clone medium 'c:\Users\username\VirtualBox VMs\Win10x64TP_1_1412225893803_7237\box-disk1.vmdk'.
VBoxManage.exe: error: VMDK: Compressed image is corrupted 'C:\Users\username\.vagrant.d\boxes\Win10x64TP\0\virtualbox\box-disk1.vmdk' (VERR_ZIP_CORRUPTED)
VBoxManage.exe: error: Details: code VBOX_E_FILE_ERROR (0x80bb0004), component Appliance, interface IAppliance
VBoxManage.exe: error: Context: "int __cdecl handleImportAppliance(struct HandlerArg *)" at line 779 of file VBoxManageAppliance.cpp
正直、うまくいかなくてまっさらから作り直したので必ずしも Guest Additions が関係しているかは不明だけど、一応参考まで。
うまくいったケースでも、 Guest Additions のインストールは最後までうまくいかなかったので、やりようによってはもう少しちゃんと出来るのかもしれない。
※参考サイト
- Vagrant で作ったり壊したりできる Windows 環境を手に入れるまでの手順(てっく煮ブログ)http://tech.nitoyon.com/ja/blog/2014/02/20/vagrant-win-guest/
- Vagrant で Windows もゲストOSに(Qiita)http://qiita.com/toruuetani/items/d86408113b18344e62c4
オライリージャパン
売り上げランキング: 274,281